Note
Go to the end to download the full example code.
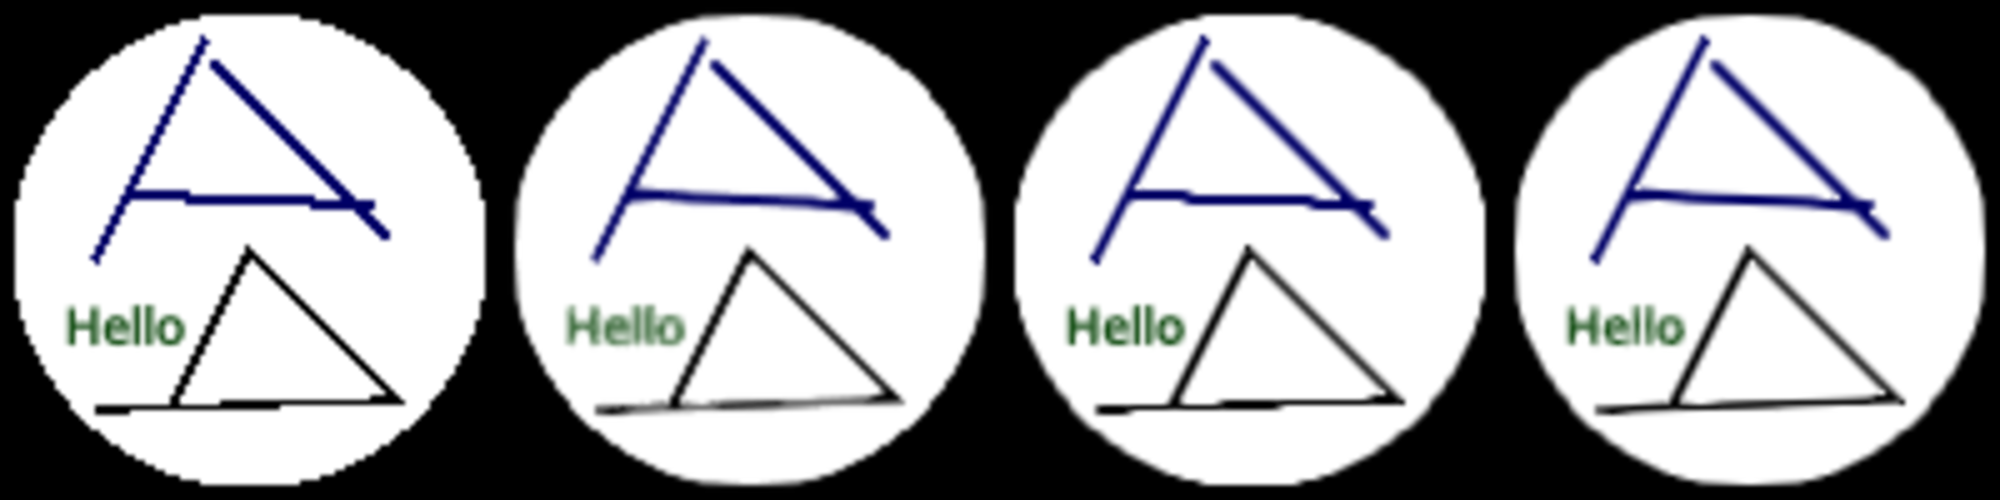
Validate ppaa
Validate the different ppaa methods.
From left to right:
The raw unfiltered pixels.
The fxaa method. Notice how long edges are nicely smoothed, but diagonal ones less so.
The ddaa1 method. Notice how the edges are smooth, but long horizontal/vertical edges have a step.
The ddaa2 method. Best of both.
Also see https://github.com/almarklein/ppaa-experiments
from rendercanvas.auto import RenderCanvas, loop
import pygfx as gfx
import pylinalg as la

# Setting up the outer scene that shows the same scene multiple, with different ppaa

n = 4

canvas = RenderCanvas(size=(500 * n, 500))
renderer = gfx.renderers.WgpuRenderer(canvas)

textures = []
meshes = []


for i in range(n):
    tex = gfx.Texture(dim=2, size=(500, 500, 1), format="4xu1")
    mesh = gfx.Mesh(
        gfx.plane_geometry(),
        gfx.MeshBasicMaterial(map=gfx.TextureMap(tex, filter="nearest")),
    )
    mesh.local.position = (0.5 + i, 0.5, 0)
    textures.append(tex)
    meshes.append(mesh)

scene0 = gfx.Scene().add(*meshes)
camera0 = gfx.OrthographicCamera()
camera0.show_rect(0, n, 0, 1)


# Setup the different renderers
# Note that we retain the Mitchell pixel filter, so that pixels appear more as blobs than squares.
# To be honest, I forgot to turn the filter off, but I think it demonstrates the differences
# between the methods well; in the right-most image you can see how the Mitchell filter can
# make the diagonal-ish lines much more straight.

renderers = [
    gfx.renderers.WgpuRenderer(textures[0], pixel_ratio=0.2, ppaa="none"),
    gfx.renderers.WgpuRenderer(textures[1], pixel_ratio=0.2, ppaa="fxaa"),
    gfx.renderers.WgpuRenderer(textures[2], pixel_ratio=0.2, ppaa="ddaa"),
    gfx.renderers.WgpuRenderer(textures[3], pixel_ratio=0.2, ppaa="ddaa"),
]

# Set the max_edge_iters of the 1st ddaa renderer to 0, so it only applies diffusion
renderers[2].effect_passes[0].max_edge_iters = 0


# Setup the actual scene that gets rendered multiple times

scene = gfx.Scene()
scene.add(gfx.Background.from_color("#000"))

points = gfx.Points(
    gfx.Geometry(positions=[[0, 0, -1]]),
    gfx.PointsMaterial(color="#fff", size=95, aa=False, size_space="model"),
)
scene.add(points)

mesh1 = gfx.Mesh(
    gfx.plane_geometry(50, 2),
    gfx.MeshBasicMaterial(color="#00a"),
)
mesh1.local.position = 0, 10, 0
mesh1.local.rotation = la.quat_from_vecs((0, 100, 0), (4, 100, 0))
scene.add(mesh1)

mesh2 = gfx.Mesh(
    gfx.plane_geometry(50, 2),
    gfx.MeshBasicMaterial(color="#00a"),
)
mesh2.local.position = 10, 20, 0
mesh2.local.rotation = la.quat_from_vecs((0, 100, 0), (100, 100, 0))
scene.add(mesh2)

mesh3 = gfx.Mesh(
    gfx.plane_geometry(50, 2),
    gfx.MeshBasicMaterial(color="#00a"),
)
mesh3.local.position = -20, 20, 0
mesh3.local.rotation = la.quat_from_vecs((0, 100, 0), (-200, 100, 0))
scene.add(mesh3)

positions = [[-30, -32, 0], [30, -30, 0], [0, 0, 0], [-15, -30, 0]]
line = gfx.Line(
    gfx.Geometry(positions=positions),
    gfx.LineMaterial(color="#000", thickness=2, aa=False),
)
scene.add(line)


text = gfx.Text(
    material=gfx.TextMaterial(
        color="#080",
        aa=True,
    ),
    text="Hello",
    font_size=10,
    screen_space=False,
)
text.local.position = -25, -15, 0
scene.add(text)

camera = gfx.OrthographicCamera()
camera.show_rect(-50, 50, -50, 50)

controller = gfx.PanZoomController(camera, register_events=renderer)


@canvas.request_draw
def animate():
    # Render the scene with different renderers
    for sub_renderer in renderers:
        sub_renderer.render(scene, camera)
    # Render resulting textures to the canvas
    renderer.render(scene0, camera0)


if __name__ == "__main__":
    print(__doc__)
    loop.run()
Total running time of the script: (0 minutes 0.915 seconds)
Gallery generated by Sphinx-Gallery
Interactive example
Try this example in your browser using Pyodide. Might not work with all examples and all devices. Check the output and your browser’s console for details.