Note
Go to the end to download the full example code.
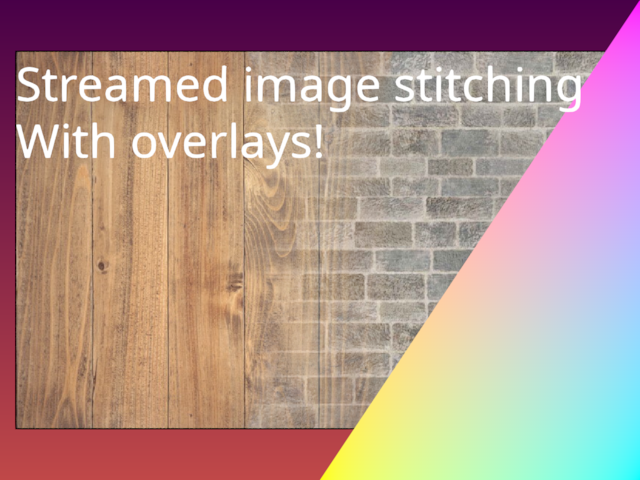
Streamed image stitching
Show stitching of images using weighted blending. The alpha value of the images are used as weights.
In contrast to the example in examples/feature_demo/image_stitching.py, this example uses streamed rendering, which means that that the images are rendered one at a time, each in their own pass.
import imageio.v3 as iio
from rendercanvas.auto import RenderCanvas, loop

# from rendercanvas.offscreen import RenderCanvas, loop
import pygfx as gfx
import numpy as np

canvas = RenderCanvas()
renderer = gfx.renderers.WgpuRenderer(canvas)

camera = gfx.OrthographicCamera()
camera.local.scale_y = -1

# Set up camera controller for user interaction
controller = gfx.PanZoomController(camera, register_events=renderer)

# A prior needs to be used to setup the camera correctly since we don't have the full scene information.
# In this case, we copied the parameters from the feature_demo/image_stitching.py example.
camera.set_state(
    {
        "position": np.asarray([411.5, 255.5, 0.0]),
        "rotation": np.asarray([0.0, -0.0, -0.0, 1.0]),
        "scale": np.asarray([1.0, -1.0, 1.0]),
        "reference_up": np.asarray([0.0, 1.0, 0.0]),
        "fov": 0.0,
        "width": 865.2,
        "height": 537.6,
        "depth": 701.4000000000001,
        "zoom": 1.0,
        "maintain_aspect": True,
        "depth_range": None,
    }
)


def create_texcoords_array(ny, nx):
    texcoord_x = np.linspace(0, 1, nx, dtype="f4")
    texcoord_y = np.linspace(0, 1, ny, dtype="f4")
    return np.stack(np.meshgrid(texcoord_x, texcoord_y), axis=2)


def create_pyramid_weights(ny, nx):
    texcoords = create_texcoords_array(ny, nx)
    center_coords = 1 - np.abs(texcoords * 2 - 1)
    return center_coords.min(axis=2)


image_names = ["wood.jpg", "bricks.jpg"]

# Create the text and background objects once, outside the animation loop
scene_text_and_background = gfx.Scene()
text = gfx.Text(
    "Streamed image stitching\nWith overlays!", font_size=64, anchor="top-left"
)
text.local.scale_y = -1
scene_text_and_background.add(text)
# Add a colorful background
scene_text_and_background.add(gfx.Background.from_color("#C04848", "#480048"))

scene_overlay = gfx.Scene()
# We recreate the triangle object using 3 triangles of different colors
# but blend them together using the weighted blending mode.
triangle_material = gfx.MeshBasicMaterial(
    color_mode="vertex",
    alpha_mode="weighted_solid",
    depth_write=True,
    depth_test=False,
)
triangle_0 = gfx.Mesh(
    gfx.Geometry(
        indices=[(0, 1, 2)],
        positions=[(0.0, -1.0, 0.5), (1.0, 1.0, 0.5), (1.0, -1.0, 0.5)],
        colors=[
            (1, 1, 0, 1),
            (1, 1, 0, 0),
            (1, 1, 0, 0),
        ],
    ),
    triangle_material,
)
triangle_1 = gfx.Mesh(
    gfx.Geometry(
        indices=[(0, 1, 2)],
        positions=[(0.0, -1.0, 0.5), (1.0, 1.0, 0.5), (1.0, -1.0, 0.5)],
        colors=[
            (1, 0, 1, 0),
            (1, 0, 1, 1),
            (1, 0, 1, 0),
        ],
    ),
    triangle_material,
)
triangle_2 = gfx.Mesh(
    gfx.Geometry(
        indices=[(0, 1, 2)],
        positions=[(0.0, -1.0, 0.5), (1.0, 1.0, 0.5), (1.0, -1.0, 0.5)],
        colors=[
            (0, 1, 1, 0),
            (0, 1, 1, 0),
            (0, 1, 1, 1),
        ],
    ),
    triangle_material,
)
scene_overlay.add(triangle_0, triangle_1, triangle_2)

overlay_camera = gfx.NDCCamera()


def animate():
    # Here the images are read in from disk. The PyGFX scene is created, and
    # then the memory can be cleared from the GPU and the CPU to make space for
    # the next image.
    x = 0
    for image_name in image_names:
        rgb = iio.imread(f"imageio:{image_name}")[:, :, :3]  # Drop alpha if it has it
        rgba = np.empty((*rgb.shape[:2], 4), np.uint8)
        weights = create_pyramid_weights(*rgb.shape[:2])
        weights = (weights * 255).astype("u1")
        rgba = np.dstack([rgb, weights])
        image = gfx.Image(
            gfx.Geometry(grid=gfx.Texture(rgba, dim=2)),
            gfx.ImageBasicMaterial(
                clim=(0, 255),
                alpha_mode="weighted_solid",
                # We want these images to write to the depth map
                # since the background should be placed behind them.
                depth_write=True,
                # The standard depth test is "<"
                # which won't work for blending these kinds of images
                # since they are positioned at the exact same depth
                depth_compare="<=",
            ),
        )
        scene = gfx.Scene()
        scene.add(image)
        image.local.x = x
        renderer.render(scene, camera, flush=False)
        x += rgba.shape[1] - 200

    # The overlay scene contains objects that are also utilizing the weighted blending modes
    # So we must clear the blending parameters before proceeding
    renderer.clear(weights=True)
    renderer.render(scene_overlay, overlay_camera, flush=False)
    # Now that we are done streaming in the images, we can add the overlay text
    # and the background to render the final image.
    # Once we have finished overlaying the text, we can flush the renderer
    # to ensure that the final image is rendered.
    renderer.render(scene_text_and_background, camera)


canvas.request_draw(animate)

if __name__ == "__main__":
    # also see comment in validate_view_offset.py (and see the draw errors when you interact with the canvas)
    # loop.run()
    canvas.force_draw()
Total running time of the script: (0 minutes 0.765 seconds)
Gallery generated by Sphinx-Gallery
Interactive example
Try this example in your browser using Pyodide. Might not work with all examples and all devices. Check the output and your browser’s console for details.