Note
Go to the end to download the full example code.
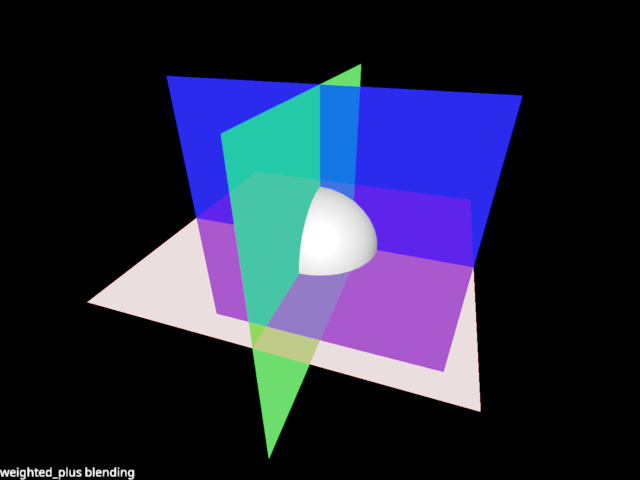
Blending weighted_plus
The ‘weighted_plus’ was a previously supported blend mode (when blending as defined on the renderer). This example mimics it’s behaviour.
This scene is particularly difficult to blend correctly, because the planes cannot be sorted by depth, causing classing blending to produce incorrect results.
Dither works great although it’s noisy.
Weighted blending also works, but you don’t see where the planes intersect.
The idea of weighted_plus is to render transparent objects with weighted blending, except the frontmost layer is actually blended correctly. A bit like depth-peeling but with one layer and using OIT for the rest.
from rendercanvas.auto import RenderCanvas, loop
import pygfx as gfx
import pylinalg as la


canvas = RenderCanvas()
renderer = gfx.renderers.WgpuRenderer(canvas)
scene = gfx.Scene()

background = gfx.Background.from_color("#000")

sphere = gfx.Mesh(gfx.sphere_geometry(10), gfx.MeshPhongMaterial())

geometry = gfx.plane_geometry(50, 50)

plane1 = gfx.Mesh(geometry, gfx.MeshBasicMaterial(color="r", opacity=0.2))
plane2 = gfx.Mesh(geometry, gfx.MeshBasicMaterial(color="g", opacity=0.5))
plane3 = gfx.Mesh(geometry, gfx.MeshBasicMaterial(color="b", opacity=0.7))


plane1.local.rotation = la.quat_from_axis_angle((1, 0, 0), 1.571)
plane2.local.rotation = la.quat_from_axis_angle((0, 1, 0), 1.571)
plane3.local.rotation = la.quat_from_axis_angle((0, 0, 1), 1.571)

scene.add(background, plane1, plane2, plane3, sphere)

camera = gfx.PerspectiveCamera(70, 16 / 9)
camera.show_object(scene, view_dir=(-1, -2, -3))
controller = gfx.OrbitController(camera, register_events=renderer)

scene.add(camera.add(gfx.DirectionalLight()))

scene_overlay = gfx.Scene()
blend_text = gfx.Text(
    text="weighted_plus blending",
    anchor="bottom-left",
    material=gfx.TextMaterial(outline_thickness=0.3),
)
scene_overlay.add(blend_text)
screen_camera = gfx.ScreenCoordsCamera()


# Give the objects some special treatment ...

opaque_objects = [background, sphere]
transparent_objects = [plane1, plane2, plane3]
objects = opaque_objects + transparent_objects

for ob in opaque_objects:
    ob.material.alpha_mode = "solid"
    ob.material.depth_compare = "<="
for ob in transparent_objects:
    ob.material.alpha_mode = "weighted_blend"

for ob in transparent_objects:
    # Clone the material
    ob.material1 = ob.material
    ob.material2 = type(ob.material)(
        color=ob.material.color, opacity=ob.material.opacity
    )

    ob.material1.depth_write = True
    ob.material1.depth_test = True
    ob.material1.depth_compare = "<="
    ob.material1.alpha_mode = "blend"

    ob.material2.depth_write = False
    ob.material2.depth_test = True
    ob.material2.depth_compare = ">"


def animate():
    # Render the scene with material 1, to prime the depth buffer
    renderer.render(scene, camera, flush=False)

    # Clear the color (not the depth)
    renderer.clear(color=True)
    renderer.render(scene, camera, flush=False)

    # Now render again with material 2, to render fragments behind the first layer, blended.
    # Note that because of the weird depth test, opaque objects are not rendered very well :(
    for ob in transparent_objects:
        ob.material = ob.material2
    renderer.render(scene, camera, flush=False)

    # And now again with material 1, to bring back that first layer.
    for ob in transparent_objects:
        ob.material = ob.material1
    renderer.render(scene, camera, flush=False)

    # The overlay
    renderer.render(scene_overlay, screen_camera, flush=False)

    renderer.flush()


if __name__ == "__main__":
    print(__doc__)
    canvas.request_draw(animate)
    loop.run()
Total running time of the script: (0 minutes 0.502 seconds)
Gallery generated by Sphinx-Gallery
Interactive example
Try this example in your browser using Pyodide. Might not work with all examples and all devices. Check the output and your browser’s console for details.